
Knowledge Base
How to do it right
It is very important to do all the steps to install the templates correctly, so that you can get everything that the template contains and so that the creation of the site was for you a pleasant fun, not a nerve-racking burden.
Please note that to use these templates you must have a Divi theme installed, which you can buy at a discount by simply clicking on the button below.
Get 10% Off Now
Download
Installation
Please see a video:
INSTALLATION VIDEO
How do I import a Divi.Expert child theme?
It's very simple.
If you've ever installed a WordPress theme, you already know what to do.
Preparation:
1. Import works best on a fresh WordPress installation with the Divi theme pre-installed.
I hope you all know that our main theme is Divi.
And there is an important condition that exists:
First, you must have installed and activated it. Without it, our Divi Child theme will not work.
2. Do not unzip the archive with the purchased Child Theme. Just have it ready to be used as a new Theme file.
The whole content of Divi.Expert's Child Theme is inside.
No other files will be added or imported separately for your new Child Theme to work.
3. If you have any other Divi Child Theme installed, deactivate and then delete it.
4. It is always recommended that you verify that you have a good backup before importing new content.
We recommend using the Updraft Plus plugin for the best results.
Installation:
1. Upload the zip-archived Divi child theme just like any theme and activate it.

1.1.
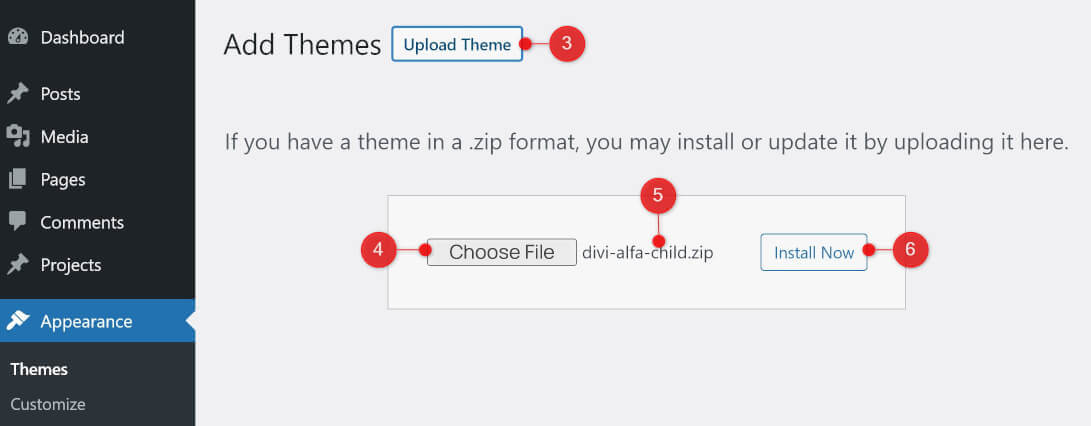
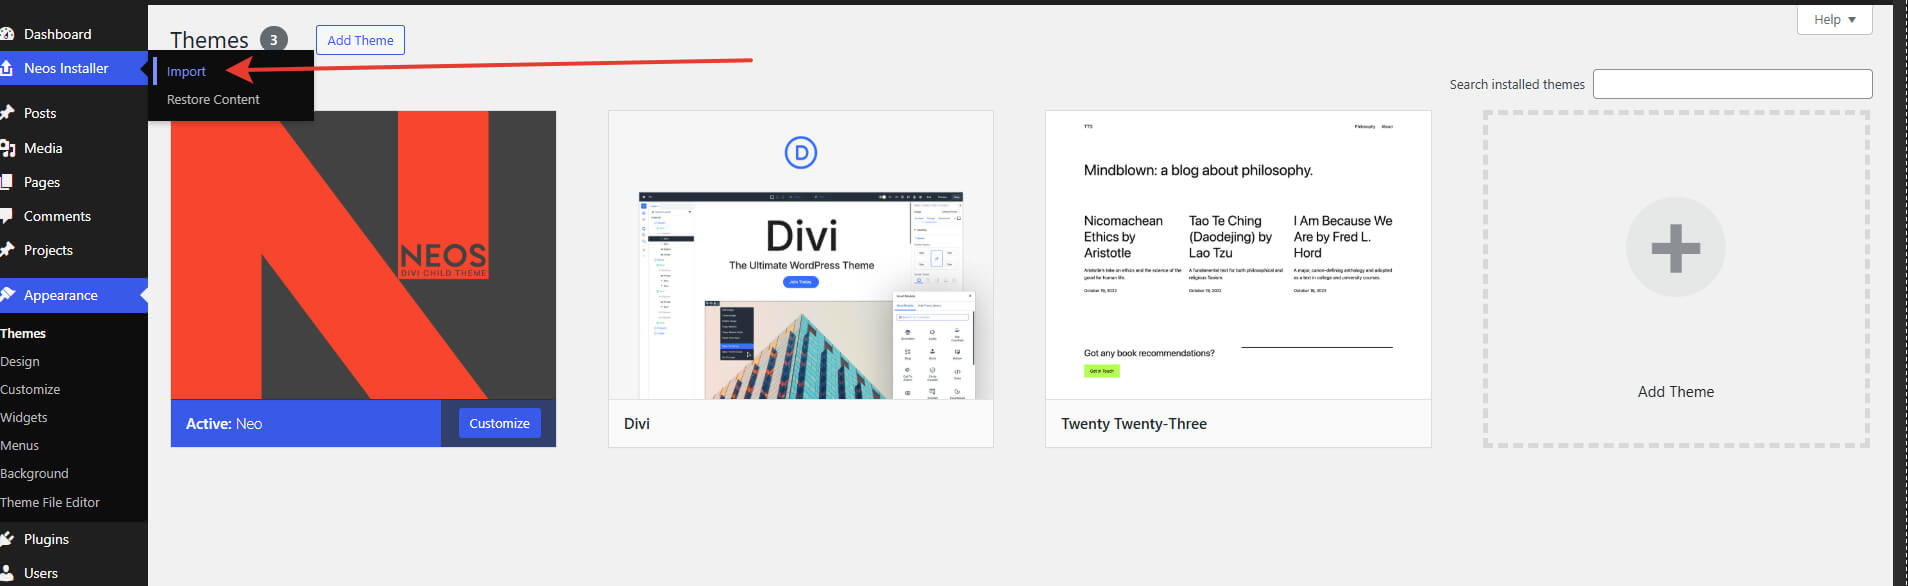
2. Once the child theme is activated you’ll see a new menu item with the name of your new child theme. This includes a button to import the demo data. Select this menu and click Easy Demo Import.

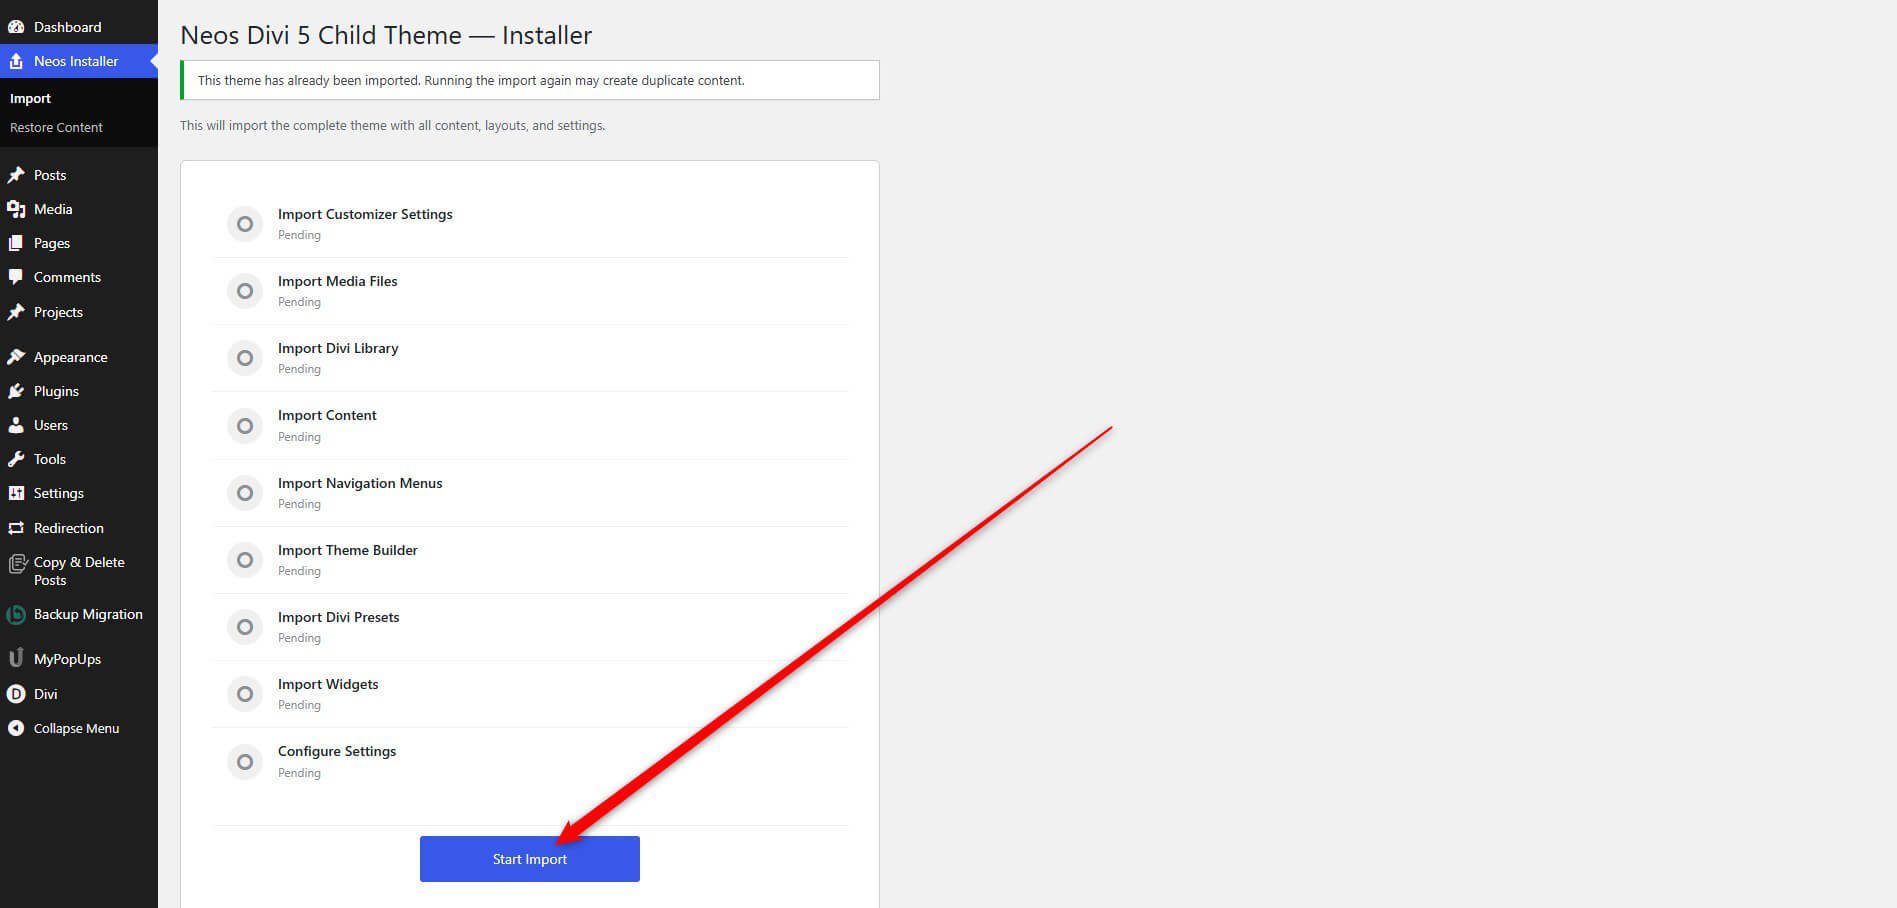
You’ll see the screen below where you can choose what to import.
You’ll also see the list of recommended plugins. Once you’ve made your selections click Import Demo Content.

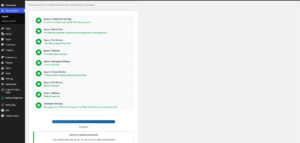
After that, you will see the progress of the installation process as follows:

As a result, you will see a window where you need to click on the button to complete the installation process.
That's it.
All custom Divi Child Theme pages and posts have been installed, and the home page is installed automatically.
No other settings will be required.
That was easy, wasn't it?
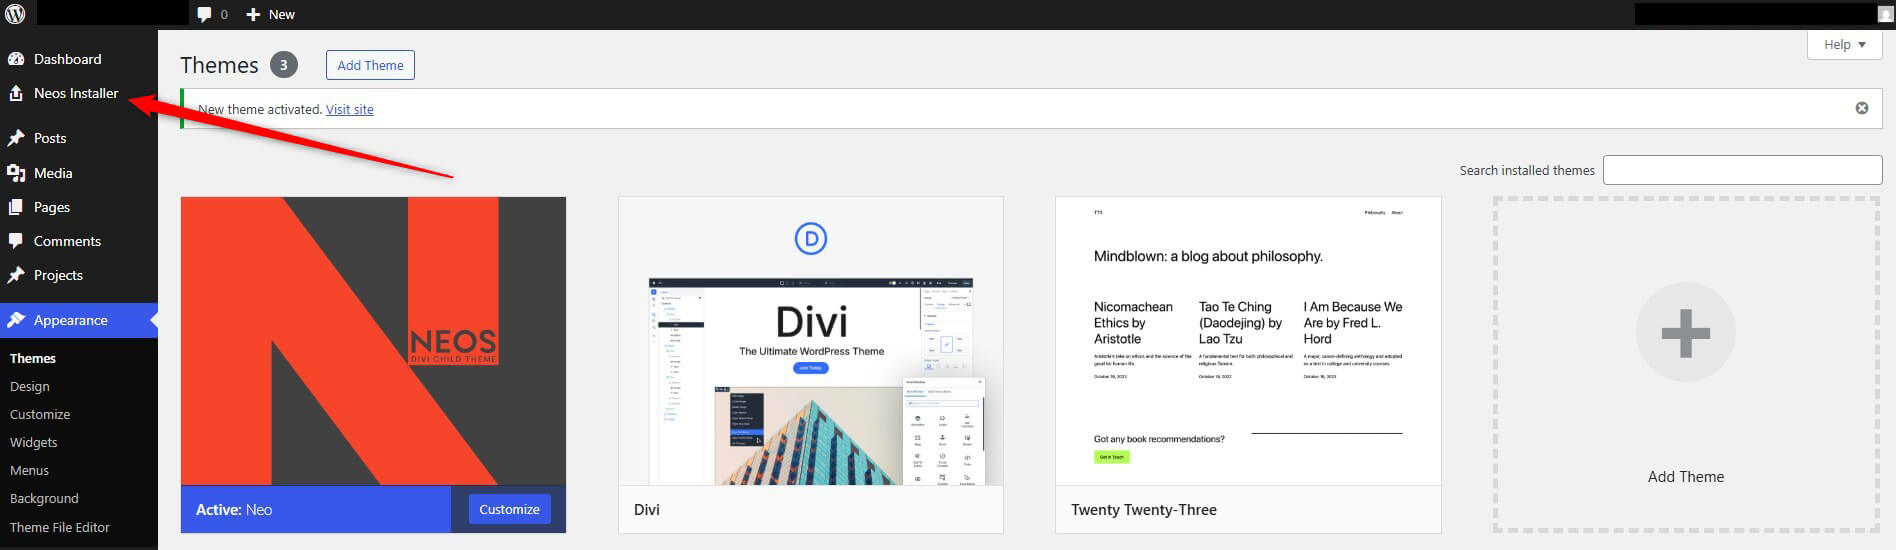
 In the dashboard of your WordPress site, go to " Divi" - > "Divi Library" and open the "Import & Export" tab.
In the "Import & Export Layouts" window that opens, select the "Import" tab and select the file to import from your computer (Don't forget to import presets).
In the dashboard of your WordPress site, go to " Divi" - > "Divi Library" and open the "Import & Export" tab.
In the "Import & Export Layouts" window that opens, select the "Import" tab and select the file to import from your computer (Don't forget to import presets).
 When the desired file is selected, click on the blue bar "Import Divi Builder Layout".
This will transfer the JSON file with the chosen layout from your computer to the Divi library on your site.
At this point, you've done 90% of the work.
Step 2:
2.1
In the dashboard of your WordPress website, go to "Pages" - "Add New" and add a title to the page as you wish. For example, "TestPage"
Then click the purple "Use Divi Builder" button.
2.1.1 From the choice of how to create the page, select "Build from scratch" and click "Start building".
Don't create rows; click on the purple circle with three dots at the bottom of the page to access the Visual Builder control buttons.
2.1.2
Click on the circle with the "plus" icon "Load from Library".
In the opened "Load from Library" window go to the "Your saved Layouts" tab, find a desired JSON file with our Page Layout, and click on it.
Before clicking on the blue button " Use this layout" don't forget to check the "Replace existing content" checkbox (if you want to have your content deleted).
You will see that the design has changed and you can start editing the content of the page.
When the desired file is selected, click on the blue bar "Import Divi Builder Layout".
This will transfer the JSON file with the chosen layout from your computer to the Divi library on your site.
At this point, you've done 90% of the work.
Step 2:
2.1
In the dashboard of your WordPress website, go to "Pages" - "Add New" and add a title to the page as you wish. For example, "TestPage"
Then click the purple "Use Divi Builder" button.
2.1.1 From the choice of how to create the page, select "Build from scratch" and click "Start building".
Don't create rows; click on the purple circle with three dots at the bottom of the page to access the Visual Builder control buttons.
2.1.2
Click on the circle with the "plus" icon "Load from Library".
In the opened "Load from Library" window go to the "Your saved Layouts" tab, find a desired JSON file with our Page Layout, and click on it.
Before clicking on the blue button " Use this layout" don't forget to check the "Replace existing content" checkbox (if you want to have your content deleted).
You will see that the design has changed and you can start editing the content of the page.
 2.1.1 From the choice of how to create the page, select "Build from scratch" and click "Start building".
Don't create rows; click on the purple circle with three dots at the bottom of the page to access the Visual Builder control buttons.
2.1.2
Click on the circle with the "plus" icon "Load from Library".
In the opened "Load from Library" window go to the "Your saved Layouts" tab, find a desired JSON file with our Landing Page Layout, and click on it.
Before clicking on the blue button " Use this layout" don't forget to check the "Replace existing content" checkbox.
You will see that the design has changed and you can start editing the content of the page.
Don't forget to change all links on the new page and add your details there!
Once completed, click Publish and your landing page is ready!
So now, if you want your customers to see this page, you must designate it as your home page.
Please do the following:
2.1.3 On the dashboard of your WordPress website, go to "Settings" - "Reading" - "Your home page displays as",
select "Static Page (select below)" and choose the name of your page (it was "Home", wasn't it?).
Don't forget to save your settings.
It is all!
2.1.1 From the choice of how to create the page, select "Build from scratch" and click "Start building".
Don't create rows; click on the purple circle with three dots at the bottom of the page to access the Visual Builder control buttons.
2.1.2
Click on the circle with the "plus" icon "Load from Library".
In the opened "Load from Library" window go to the "Your saved Layouts" tab, find a desired JSON file with our Landing Page Layout, and click on it.
Before clicking on the blue button " Use this layout" don't forget to check the "Replace existing content" checkbox.
You will see that the design has changed and you can start editing the content of the page.
Don't forget to change all links on the new page and add your details there!
Once completed, click Publish and your landing page is ready!
So now, if you want your customers to see this page, you must designate it as your home page.
Please do the following:
2.1.3 On the dashboard of your WordPress website, go to "Settings" - "Reading" - "Your home page displays as",
select "Static Page (select below)" and choose the name of your page (it was "Home", wasn't it?).
Don't forget to save your settings.
It is all!Image Source Info
Documentation
You can find all the info here
